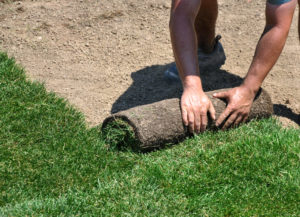
Blog

Scroll

Blog

Helping New Sod to Flourish

First 2 Weeks

The key to establishing new sod is to keep it properly watered for the first month. Immediately after installing sod, water thoroughly making it spongy to the step. The new sod should be kept thoroughly wet to a depth of 4″ to 6″ and watered 2 to 3 times a day during the first 7 to 14 days depending on the season. Lift a corner of the sod to determine the depth of moisture. In the first week, it is very important to keep the new sod damp. During this time stay off the sod so it can take root and you do not sink in and leave depressions from your foot steps. During hot weather, sprinklers should run several times a day so the new sod never dries out. If allowed to dry out, the sod will shrink, brown, and can die. The roots of your new sod will penetrate the soil faster and root down sooner if properly watered. At the end of week 2, dry up the yard enough so you can mow.

Weeks 3 & 4

The following 2 weeks are used to transition from frequent daily watering to fewer cycles per day and increase the number of days between waterings. During week 3, reduce waterings to 1 time per day and skip a day between watering if the new sod is not drying out. By week 4, water 1 to 2 times every other day. After week 4, your new yard should be ready to go 2 to 3 days between watering. Water your lawn in the evening or early morning when less evaporation occurs. To reduce run-off on hills and promote deep root growth, reduce watering times in half. One hour later, run the irrigation cycle again and apply the rest of the water. This allows the water to soak into heavy soils.

Rest of the Season

Your new lawn will need more water the first growing season and especially the first 6 months. As it roots deeper over the course of a year, it will need less water. If your lawn looks dry, it probably needs watering. The key to new sod care during this time is deep watering less frequently. This will help the roots grow down and develop a deep root system that uses less water. It is OK after the first two months to stress your lawn a little. This means let your yard dry out a bit and when you see signs of stress starting to appear, make sure to water. This will also allow you to fine tune the sprinkler system and adjust heads for proper coverage and change nozzles for more or less water in certain spots.

Mow if Grass exceeds 3.5″

Your new lawn should be mowed at the end of week 2 or if you lawn exceeds 3 1/2″ tall. Back off on the watering so the turf is dry to the touch and firm enough to walk on without sinking in. If your new lawn reaches over 3 1/2″, mow off a third of the length even if it has not been two weeks. Do not cut shorter than 2″ for the first few times you mow. Exercise caution the first time you mow so you do not damage or pull up the sod. If some of the sod does move around, don’t worry. Just put it back in place and it will grow in.

Caring for a Newly Seeded Lawn

Watering

This may be the most important step. With the first watering, make sure that you apply enough water to wet the soil down to at least 6 to 8 inches. Apply the water gently so that you don’t wash the seed away or create puddles.

You may have to water several times in short intervals until the bed is thoroughly wet. After that, water often enough to keep the top inch or so of the seedbed moist until the seed germinates. Remember, seeds get only one shot at germination. If you let them dry out, they will die.

Sprinkle the seedbed lightly with a handheld hose several times a day — especially if it’s hot or windy — to get even germination across the entire lawn. However, you don’t want to overdo it. Too much water causes the seed to rot.

Watch the color of the soil surface. As the soil dries, the surface becomes lighter in color. When you notice about half to two-thirds of the surface lightening up, it’s about time to water.

Caring for your new lawn after germination

As your new lawn becomes established, you can start easing up on the water, depending on the weather. If you continue your everyday watering routine, you’re likely to overdo it and rot the young seedlings. Also, if the ground is too wet, you can inhibit root growth.

When you have a pretty even ground cover of new seedlings, try skipping a day of watering and see what happens. Watch the grass carefully. If the color starts to go from bright green to dull gray green, the grass needs water. You may have to water some quick-to-dry areas with a handheld hose.

If the grass doesn’t dry out, keep stretching the intervals between watering until you’re on a schedule of once or twice a week, or as needed. When you do water, don’t forget to water deeply, getting the moisture down 6 to 8 inches.

Mowing and fertilizing

You will need to mow the new lawn when it reaches 3 to 4 inches high, depending on the type of grass. Mow when the soil is on the dry side; otherwise, you might tear up the new turf. Make sure not to have your mower set too low. It is always good to mow grass at 3 inches or higher to prevent it from drying out. This is especially true for your new lawn.

You also need to make your first application of fertilizer about 4 to 6 weeks after germination. Young seedlings have a hefty appetite, so don’t skip this important feeding. It is very typical to have broadleaf weeds pop up in newly seeded areas. Whether it’s new soil or freshly cultivated soil, it is a prime target for blowing weed seeds to find a home. Don’t worry too much about the weeds until the grass is about 8-10 weeks established. After that you can apply a weed and feed fertilizer or a systemic spray to take care of the broad leaf weeds. Regular weed control and fertilizer applications as needed are recommended for a nice healthy lawn.

Get Your Yard and Flower Beds Ready for Spring

The rising temperatures remind us that spring is coming, even if we see more snow before it finally arrives. You might not be ready just yet to break out the gardening gloves or the mower, but it’s a good time to start making your plan of attack. Get ready for spring with these helpful tips for lawn and garden maintenance that will lead to a beautiful growing season. Continue reading “Get Your Yard and Flower Beds Ready for Spring”

Knutsen Landscaping Featured in Lawn and Landscape Magazine

Andy Knutsen, owner of Knutsen Landscaping, was recently interviewed for Lawn and Landscape magazine’s September 2016 feature about landscape lighting.  Andy is quoted several times, most notably with, “Landscapers have a good opportunity to artistically design a lighting job whereas an electrician isn’t really in it for the artistic flairs. You want to get lights to enhance what you have back there, but not light up the sky.”

Continue reading “Knutsen Landscaping Featured in Lawn and Landscape Magazine”

Save $250 on Your Ten-Light Landscape Illumination Package

Our solid bronze, LED fixtures are perfect to showcase the front of your home, a feature tree, and your front path.  Book your installation before December 31, 2016, and you’ll save $250 on any package of ten lights or more.  Our CAST® Classic or Craftsman Series lights include walkway and directional light options.  Call Andy at 717-872-2500 today!

Continue reading “Save $250 on Your Ten-Light Landscape Illumination Package”

Using Color in All the Seasons

Your yard may always include a lot of green, but it doesn’t have to feel monochromatic in any season.  By arranging plants, shrubs, and outdoor accessories to best compliment each season’s natural beauty, your outdoor areas can be a stunning rainbow around the calendar.

Timing Plant Blooms

Think beyond just daffodils in the spring, peonies in the summer, and mums in the fall.  There are hundreds of choices for each season that will keep your yard colorful.  Before selecting a new plant, review its estimated bloom season and place it according to where your garden will need color in that time.  Also, look for ways that you can use pruning or other techniques to help your plants bloom at just the right time.

Rainbow Variety

Many popular plants have traditional colors, but you can offer a surprise with unique varieties.  Also, try flowers with multi-colored blooms in a group.  You can also create a three-dimensional color effect by building “tiers” with tall flowers in the back behind shorter blooms in front.

The Appeal of the Three-Dimensional Yard

We observe our surroundings with multi-faceted senses.  We don’t just notice a home’s color, but its noises, textures, and even smells.  With a yard, you observe not just the plants and the lawn, but the environment’s creative arrangement. Are the flowers’ blooming seasons thoughtfully timed?  Are there chairs in areas you’d like to sit?  Are the yard accessories like fences, gates, and children’s play sets arranged functionally?

Yards are meant to be used, not looked at.  By adding a third dimension to your yard, its beauty and usability can both be enhanced.

Shade

If your yard has plenty of mature tree cover, you’re in luck on this one.  But if not, you can consider other options.  A table with a classy, fashionable umbrella can be a picnic life-saver.  A pergola, gazebo, or other outdoor shaded enclosure can cut the sun to offer comfort, but also serve as a tall focal point for your yard’s design.

Seating

The old stump in the yard isn’t going to last forever, so investing in long-lasting, beautiful outdoor seating is a good idea.  From swings and hammocks to benches, chairs, and picnic tables, the possibilities are endless.  Look for patterns and materials that will help deepen the multi-dimensional effect you a building.  Cream-colored chairs against cream-colored siding will disappear.  Try an exciting pattern on a grey patio or a bold white against a dark hedge.

After selecting the styles that appeal to your lifestyle, position the furniture for maximum comfort and easy conversation.  Arrangements should encourage your family and guests to take in the loveliest views of your property.